



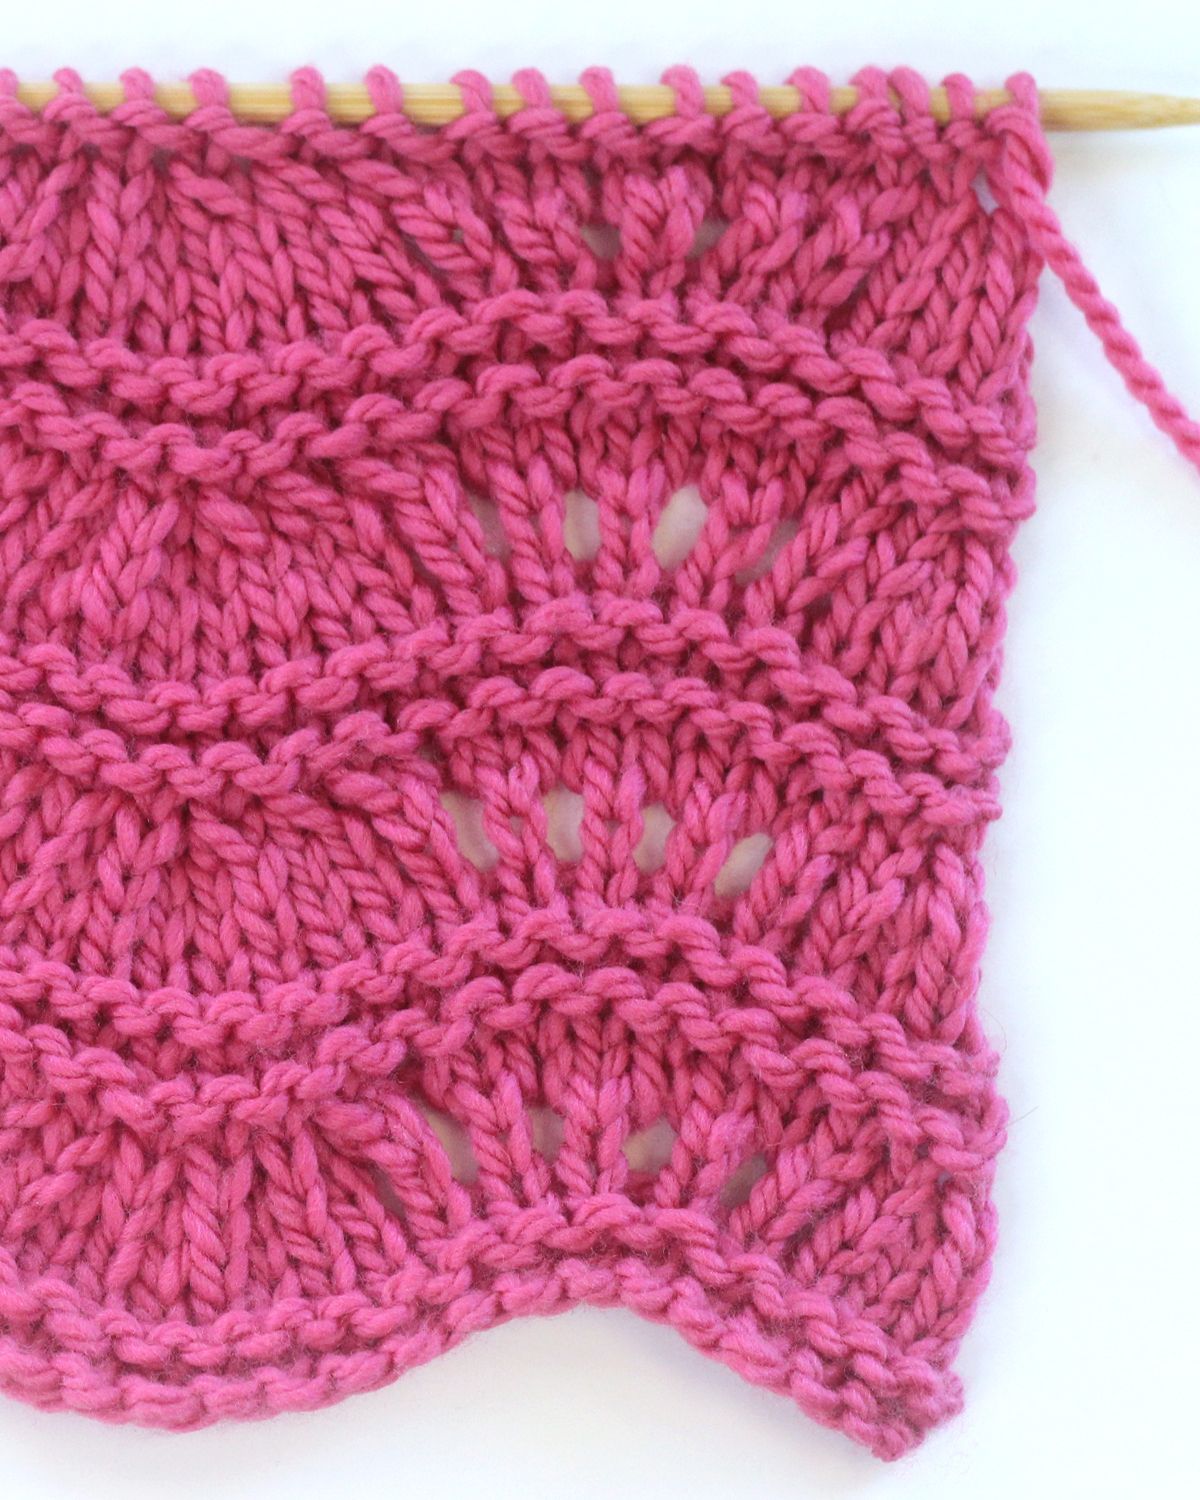
Ripple Ridge Lace Knit Stitch Pattern: A Complete Guide to This Stunning Textured Design
Few things in knitting offer the same satisfaction as watching a ripple ridge lace pattern emerge from your needles. It’s the kind of stitch that looks impossibly intricate from across the room but reveals itself to be remarkably approachable once you understand its underlying logic. Whether you’re a confident beginner eager to try your first lace work or an experienced knitter looking to add a new texture to your repertoire, the ripple ridge lace stitch is one of those patterns worth knowing deeply.
This comprehensive guide will walk you through everything — the stitch definition, its visual characteristics, the yarn and needle choices that make it shine, a step-by-step instruction section, tips for avoiding the most common mistakes, and ideas for incorporating it into finished projects. By the end, you’ll have all the knowledge you need to cast on with confidence.
What Is the Ripple Ridge Lace Knit Stitch Pattern?
The ripple ridge lace stitch pattern is a combination of two design principles that, on their own, are already beloved by knitters: the flowing, wave-like movement of ripple stitches and the airy, open quality of lace knitting. When these two elements are combined, the result is a fabric that has both physical dimension — actual ridges that rise from the surface — and visual openness from the yarn overs and decreases that create lace holes.
The pattern typically works on a repeat of between 8 and 12 stitches, which makes it scalable. A narrow swatch of 24 stitches will show you three complete repeats, giving you an accurate sense of how the finished fabric will look. The ridges in the pattern run diagonally or in a chevron formation depending on the variation, and the lace holes are positioned so that they seem to float inside the peaks and valleys of the wave structure.
What makes this stitch particularly interesting to knitters is that the increases and decreases that create the lace openings do double duty. They’re not just decorative; they also sculpt the rippling, undulating texture. Every yarn over adds an eyelet and also tilts the knit stitches beside it. Every decrease closes a pair of stitches and nudges the surrounding fabric into a lean. The interplay between these two forces is what gives the ripple ridge lace stitch its distinctive, slightly three-dimensional quality.
The Visual Appeal: Why Knitters Fall in Love With This Pattern
Pull up any online knitting gallery and search for ripple lace shawls or ripple lace blankets, and you’ll quickly see why this pattern has such enduring popularity. The fabric catches light differently across the peaks and valleys of each ripple. Eyelets tend to sit in the dips between ridges, creating a shadowed, honeycomb-like effect when the piece is laid flat, and a flowing, almost liquid appearance when it’s held up or draped.
Worked in a solid yarn, the ridge texture is the star. Every ripple pops clearly because there’s no color variation competing for attention. The fabric looks architectural and precise, like something that took far more skill than it actually required.
Worked in a hand-dyed or variegated yarn, the ripple structure acts like a canvas for color movement. The diagonal lines of the ridge guide the eye along the color transitions in a way that a simple stockinette stitch never could. Colors pool differently in the peaks than in the valleys, creating a subtle, organic gradient effect that feels intentional even when it’s entirely determined by the skein.
Yarn and Fiber Choices for Ripple Ridge Lace
Choosing the right yarn is one of the most important decisions you’ll make for this pattern, because the stitch structure depends on the fabric behaving in specific ways.
Laceweight and fingering weight yarns are the most traditional choice. They allow the eyelets to open fully and the lace quality to breathe. A laceweight mohair-silk blend, for instance, will create a halo around each eyelet and give the finished fabric an ethereal, soft-focus quality. A fingering weight merino will produce something crisper and more defined.
DK and sport weight yarns work wonderfully when you want the same stitch pattern at a larger scale. The ridges become more pronounced and the eyelets more substantial, which reads as bold rather than delicate. This is a great choice for throws and blankets, where you want the pattern to be visible from a distance.
Avoid very fuzzy or bouclé yarns for your first attempt. These fiber textures hide the stitch definition and make it difficult to see your work as you go, which increases the chance of making errors you won’t notice until much later. Once you know the pattern well enough to work it almost by feel, textured yarns become an interesting creative experiment — but they’re not the best learning environment.
Natural fibers tend to block better than synthetics, and blocking is genuinely important for lace knitting. Wool, alpaca, and silk will all open up beautifully when wet-blocked, which is the process of soaking the finished piece and then stretching it out to dry. This step transforms a slightly bunched and uneven piece of lace fabric into something flat, even, and professionally finished.
Needle Choice and Gauge
Lace knitting generally benefits from a needle that is one or even two sizes larger than the yarn’s label suggests. This is counterintuitive to knitters who are used to following gauge recommendations precisely, but lace needs space. The eyelets must be large enough to be visible and to open properly when blocked. If your fabric feels dense or the eyelets look like tiny pinpricks, try going up a needle size.
For laceweight yarn, a US size 4 to US size 6 needle (3.5mm to 4mm) is often a good starting range. For fingering weight, try US size 3 to US size 5. For DK, something in the US size 6 to US size 8 range often works well. Always knit a swatch, wash and block it, and measure before beginning a large project.
The ripple ridge lace stitch is not a stitch where row gauge is irrelevant. Because the pattern creates physical ridges that consume a certain vertical height per repeat, projects like shawls and blankets will look quite different depending on whether your row gauge is tight or loose. A loose row gauge stretches the ripples out and creates a more elegant, elongated look. A tight row gauge compresses them into something chunkier.
Step-by-Step Pattern Instructions
Before diving into the instructions, here are a few key abbreviations and terms used throughout:
k — knit, p — purl, yo — yarn over, k2tog — knit two stitches together (a right-leaning decrease), ssk — slip, slip, knit (a left-leaning decrease), rep — repeat, RS — right side, WS — wrong side.
The basic ripple ridge lace pattern works on a multiple of 10 stitches plus 1, which allows for complete repeats across the row with a balancing stitch at the end.
Cast on: Any multiple of 10 stitches, plus 1. A good practice swatch is 31 stitches (three full repeats plus 1).
Setup row (WS): Purl across all stitches.
Row 1 (RS): K1, yo, k3, ssk, k2tog, k3, yo, k1; rep from to end.
Row 2 (WS): Purl across all stitches.
Row 3 (RS): K1, k1, yo, k2, ssk, k2tog, k2, yo, k2; rep from to end.
Row 4 (WS): Purl across all stitches.
Row 5 (RS): K1, k2, yo, k1, ssk, k2tog, k1, yo, k3; rep from to end.
Row 6 (WS): Purl across all stitches.
Row 7 (RS): K1, k3, yo, ssk, k2tog, yo, k4; rep from to end.
Row 8 (WS): Knit across all stitches (this creates the ridge).
Repeat rows 1 through 8 for the full pattern.
Notice what row 8 does. By knitting on the wrong side, you create a purl ridge on the right side of the fabric. This is the “ridge” in ripple ridge lace — it’s a visual and textural line that punctuates each repeat and gives the pattern its name. Every eight rows, a clean horizontal or slightly angled ridge forms, breaking up the ripple movement and adding a secondary layer of texture.
The yo paired with the ssk and k2tog across the pattern rows creates the lace eyelets. If you count carefully, each yarn over is compensated by one decrease, which means the stitch count stays constant across every row. This is a key feature of most lace patterns: stitch count may fluctuate within a row as yarn overs are added and decreases are made, but by the end of each row, you should have the same number of stitches you started with. If you’re coming up short or long, count your yarn overs and your decreases — they should always match.
Common Mistakes and How to Avoid Them
Even experienced knitters encounter a few predictable pitfalls with ripple ridge lace. Knowing about them in advance will save you from having to rip back and start over.
The most frequent error is a missed yarn over. A yarn over in lace isn’t just a stitch — it’s the eyelet itself. If you skip one, you’ll be one stitch short by the end of the row and the eyelet won’t be there. The fix is to use a stitch marker between each repeat as you learn the pattern. Markers let you verify your stitch count within each repeat and catch a missing yarn over immediately rather than 10 stitches later.
The second common issue is confusing the orientation of ssk and k2tog. Both are decreases that eat two stitches and leave one, but ssk leans left and k2tog leans right. The pattern uses both deliberately to create a mirrored, symmetrical lean on either side of the central decrease point. If you substitute one for the other, the eyelets will look lopsided and the ripple effect will feel off-center. Take a moment before you sit down to knit to remind yourself which is which.
A third mistake that beginners often make is purling row 8 rather than knitting it. It’s an easy habit to fall into because most wrong-side rows in this pattern are purl rows. But the ridged quality of the pattern depends entirely on that knit row on the wrong side. If you accidentally purl it, you’ll lose the ridge and the pattern will look like a standard lace ripple without the textural punctuation.
Using a row counter or a simple notebook tally can make a significant difference in managing an 8-row repeat. Lace knitting benefits enormously from tracking where you are.
Blocking Your Finished Ripple Ridge Lace Piece
Blocking is not optional in lace knitting — it’s the step that finishes the fabric. Before blocking, lace often looks uneven, slightly rumpled, and unclear. The eyelets may be nearly invisible, the ridges subtle, and the ripples irregular. This is normal. After blocking, everything transforms.
For wool and plant fibers, wet blocking works best. Soak your finished piece in cool water for 20 to 30 minutes. Don’t agitate or wring it — just let it absorb the water fully. Press out the water gently, roll it in a clean towel to remove excess moisture, and then lay it on a blocking board or a flat, clean surface covered with foam mats.
Use blocking wires or T-pins to stretch the piece to the intended dimensions. For ripple ridge lace, you want to stretch slightly along both the horizontal and vertical axes so that the ripples open up and the eyelets become clearly visible. Pin the edges at regular intervals and let the piece dry completely before removing the pins. For a shawl or blanket, this may take 24 to 48 hours depending on humidity.
The difference before and after blocking can feel almost magical. The eyelets open into proper holes, the ridges become sharper and more pronounced, and the ripple formation snaps into clarity. If you’ve been knitting and feeling uncertain about whether your tension or technique was right, blocking will usually answer that question in the most reassuring way possible.
Project Ideas Using the Ripple Ridge Lace Stitch
The ripple ridge lace stitch is versatile enough to anchor a wide range of projects, from small accessories to large statement pieces.
Shawls and wraps are the most natural home for this stitch. A crescent or triangular shawl worked in laceweight yarn over many repeats of the 8-row pattern creates a fabric that drapes beautifully and photographs stunningly. The ripple edge gives the shawl a naturally scalloped look even without additional edging.
Baby blankets are another wonderful application, especially in a soft DK weight cotton or cotton-blend yarn. The stitch adds visual interest without requiring a complex or heavy fabric, and the ripples give the blanket an heirloom quality.
Lightweight scarves and cowls in fingering weight yarn work up relatively quickly and make excellent gifts. The stitch has enough visual interest to be impressive but isn’t so complex that it becomes tedious over the length of a scarf.
Table runners and dishcloths, while more utilitarian, can also benefit from this pattern worked in cotton yarn. A table runner in a natural linen cotton blend, worked in ripple ridge lace, becomes a genuinely beautiful piece of home décor.
For garments, the stitch can work well as a panel on the body or sleeves of a cardigan or as the entire fabric of a lightweight summer top. The openness of the lace makes it ideal for warm-weather knitting, and the ridge structure adds enough visual weight that the finished garment looks intentional and designed rather than simply a vehicle for showing off the stitch.
Tips for Experienced Knitters Looking to Customize
Once you have the base pattern in your muscle memory, there are many directions you can take it.
You can shift the direction of the ripples by reversing which side the ssk and k2tog fall on, creating waves that lean the opposite way. You can work two opposing ripple patterns side by side, separated by a central stitch, to create a chevron or herringbone formation. You can also add additional ridge rows — using row 8’s knit-on-wrong-side technique — at the end of every other repeat to create a heavier textural fabric with more pronounced horizontal bands.
Adjusting the stitch repeat from 10 to 12 adds extra knit stitches between the eyelets, which spaces the ripple peaks farther apart and creates longer, more gradual waves. Reducing it to 8 compresses the waves and creates a tighter, more active texture.
A Note on Reading Lace Charts
If you prefer to work from a visual chart rather than written row-by-row instructions, the ripple ridge lace pattern translates cleanly into chart form. Each symbol represents one stitch or action: a circle for yarn over, a right-leaning slash for k2tog, a left-leaning slash for ssk, a dash for purl, and a blank square for knit. Row 8, the ridge row, would be marked with dashes across every square on the wrong-side row to indicate knitting on the WS.
Working from a chart lets you visualize the geometry of the stitch as you knit. Many lace knitters find that once they can see the pattern on paper and match it to the developing fabric on their needles, the two start to inform each other. They stop needing to count quite as carefully because the pattern itself — the visual fabric they’re building — tells them where they are.
Final Thoughts
The ripple ridge lace knit stitch pattern is one of those techniques that rewards patience and attention in a very visible way. Every eight rows, you see the result of your work take shape — another ripple completed, another ridge formed, the fabric growing into something richer and more complex than any individual stitch could suggest on its own.
Whether you’re knitting this for the first time on a small gauge swatch or working it across 300 stitches of a generous shawl, the fundamental satisfaction is the same: the interplay between structure and openness, between the solid ridges and the airy eyelets, is genuinely beautiful. It’s the kind of fabric that makes people reach out to touch it when they see it, and the kind of pattern that makes knitters feel skilled and creative every time they pick up their needles.
Cast on, find your rhythm, and let the ripples build.


